杂谈
使用Hugo和GitHub部署博客
首先需要安装 Git 和 GO,这样的教程有很多。
一、Windows 安装 Hugo
1. 准备工作
首先需要安装 Git 和 GO,这样的教程有很多。
2. 预构建的二进制安装
在 hugo 发布页 下载最新的二进制文件,在合适的目录下解压,将目录添加的 PATH 中。
二、构建网站并添加主题
建议使用 git bash。
1. 构建网站
使用指令构建 hugo 网站。
hugo new site your_blog_path2. 添加主题
本步骤并不唯一,建议根据自己选择的主题所提供的安装文档进行安装。
PaperMod 主题文档建议方法如下:
git submodule add --depth=1 https://github.com/adityatelange/hugo-PaperMod.git themes/PaperMod
git submodule update --init --recursive # needed when you reclone your repo (submodules may not get cloned automatically)
除此之外也可以使用
Git Clone、ZIP、Hugo module等方法安装。
修改配置文件 hugo.yaml ,添加 theme: ["PaperMod"]。
三、撰写第一篇文章
1. 生成文章
使用指令生成文章文件 hugo new posts/first-post.md,文章在 contents 目录下。
如果在文章中使用图片,则引用图片的根目录为 static目录,例如 /posts/first-post/img.jpg 引用的实际路径为 static/posts/first-post/img.jpg。
2. 本地预览
hugo server -D 启动本地服务器,访问 localhost:1313 即可预览,-D 参数表示构建草稿。
文章 meta 信息中的 draft 字段表示文章是否为草稿,草稿文件默认不会被构建。
四、使用 Action 部署到 GitHub Pages
为什么不直接提交 public 到 **.github.io ?因为我不想再用一个额外的库来同步整个 Hugo 站点。
使用 Action 操作可以直接将所有站点文件上传到 **.github.io,然后通过 Action 自动构建 Pages。
1. 添加 workflow
建立新文件 .github/workflows/hugo.yaml,内容如下:
下面的文件为自用文件,请修改 branches 和 HUGO_VERSION,如果使用 submodule 方式添加 themes,则 deploy.steps 下的 uses 和 with 字段请保留。
# Sample workflow for building and deploying a Hugo site to GitHub Pages
name: Deploy Hugo site to Pages

on:
  # Runs on pushes targeting the default branch
  push:
    branches:
      - main

  # Allows you to run this workflow manually from the Actions tab
  workflow_dispatch:

# Sets permissions of the GITHUB_TOKEN to allow deployment to GitHub Pages
permissions:
  contents: read
  pages: write
  id-token: write

# Allow only one concurrent deployment, skipping runs queued between the run in-progress and latest queued.
# However, do NOT cancel in-progress runs as we want to allow these production deployments to complete.
concurrency:
  group: "pages"
  cancel-in-progress: false

# Default to bash
defaults:
  run:
    shell: bash

jobs:
  # Build job
  build:
    runs-on: ubuntu-latest
    env:
      HUGO_VERSION: 0.134.2
    steps:
      - name: Install Hugo CLI
        run: |
          wget -O ${{ runner.temp }}/hugo.deb https://github.com/gohugoio/hugo/releases/download/v${HUGO_VERSION}/hugo_extended_${HUGO_VERSION}_linux-amd64.deb \
          && sudo dpkg -i ${{ runner.temp }}/hugo.deb
      - name: Install Dart Sass
        run: sudo snap install dart-sass
      - name: Checkout
        uses: actions/checkout@v4
        with:
          submodules: recursive
          fetch-depth: 0
      - name: Setup Pages
        id: pages
        uses: actions/configure-pages@v5
      - name: Install Node.js dependencies
        run: "[[ -f package-lock.json || -f npm-shrinkwrap.json ]] && npm ci || true"
      - name: Build with Hugo
        env:
          HUGO_CACHEDIR: ${{ runner.temp }}/hugo_cache
          HUGO_ENVIRONMENT: production
          TZ: America/Los_Angeles
        run: |
          hugo \
            --gc \
            --minify \
            --baseURL "${{ steps.pages.outputs.base_url }}/"
      - name: Upload artifact
        uses: actions/upload-pages-artifact@v3
        with:
          path: ./public

  # Deployment job
  deploy:
    environment:
      name: github-pages
      url: ${{ steps.deployment.outputs.page_url }}
    runs-on: ubuntu-latest
    needs: build
    steps:
      - uses: actions/checkout@v2
        with:
          submodules: true
          fetch-depth: 0
      - name: Deploy to GitHub Pages
        id: deployment
        uses: actions/deploy-pages@v4
2. 启用 Action
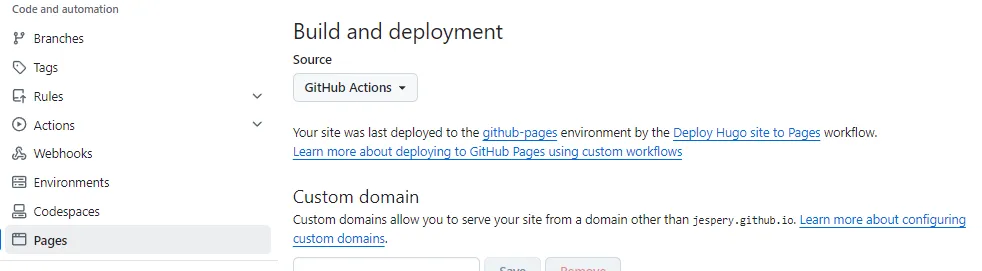
在你的 **.github.io 库中的 settings -> pages 页面,将 Build and deployment 的 Source 改为 GitHub Actions。
3. 提交修改
将整个博客站点的文件提交到 **.github.io,会自动执行 Action,构建网站。在库的 Action 页面可以看到构建状态。